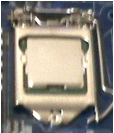
When the motherboard is inserted then you can install the CPU, so lift up the arm next to the CPU socket and install your CPU the right way round (using the little triangles on the socket and CPU to line up the both) then secure tightly with putting the arm back into position
Wednesday, 16 January 2013
Step 4- Installing the Motherboard and CPU
Now that the back-plate is installed, and the 'hop-ups' are inserted, you can now move onto unpacking your motherboard, don't forget to use anti-static precautions when touching your components, depending on what size your motherboard is, depending how many screws you will need, mine is m-atx so I need 6 screws, so place your motherboard in place and insert the screws into the hop-ups that you installed earlier, making sure the motherboard lines up with the back plate too, it will look a bit like
When the motherboard is inserted then you can install the CPU, so lift up the arm next to the CPU socket and install your CPU the right way round (using the little triangles on the socket and CPU to line up the both) then secure tightly with putting the arm back into position
When the motherboard is inserted then you can install the CPU, so lift up the arm next to the CPU socket and install your CPU the right way round (using the little triangles on the socket and CPU to line up the both) then secure tightly with putting the arm back into position
Subscribe to:
Post Comments (Atom)


No comments:
Post a Comment