
Wednesday, 16 January 2013
Completion of the Hardware
Step 11- Connecting Cables and Finishing Off
This is the final step of this hardware guide, but there's still vital information that you need to know,


Now you need to connect the cables you haven't connected yet, such as the PSU cables, connected the motherboard the CPU and other devices you might have such as hard drives optical drives and system fans by using either the sata power cable or molex power cable, use this guide

Now you need to connect your Data cables such as sata,ide cables, they connect to your motherboard by using the motherboard labels and then connect to your drive, ide are usually old hard drives or old cd drives, nowadays sata is widely used, but it works in the same way as the ide does they look like

Step 10- Connecting Front Panel Cables
Now you need to connect your front panel cables such as the light, the power switch, reset button, usb ports and many more, every motherboard is different in where the pinnouts are, so refer back to your motherboard manual for 'front panel jumpers' then correspond them with the cables of your case and install them on to the correct pin, when its done it should look like

Step 9- Install any PCI cards
Now your are nearly done you can now install your PCI cards, for example a better graphics card, a wireless networking card, an extra usb hub card, there are many,
Before you unpackage your card, you need to take the back panel slot of the case, this is where the cards are inserted and then exposed so the user can use them, they are normally secured with a screw and there are normally about 5/6 of them depending on your case, so take out the right one and install your card buy fastening it into place, and then when its inserted on your motherboard then you can secure it with the screw that was there it will look a bit like this when its done

Before you unpackage your card, you need to take the back panel slot of the case, this is where the cards are inserted and then exposed so the user can use them, they are normally secured with a screw and there are normally about 5/6 of them depending on your case, so take out the right one and install your card buy fastening it into place, and then when its inserted on your motherboard then you can secure it with the screw that was there it will look a bit like this when its done

Step 8- Installing Hard Drives and Optical Drives
Now your ready to install, Optical drives and Hard drives,
First your hard drive, there are usually 'bays' to install your hard drive on and then fasten it with screws but all cases are different, refer to your manual if you cant see immediately where your hard drive goes, you should install your hard drive and secure with 4 'flat-top' drive screws, mine looks like


First your hard drive, there are usually 'bays' to install your hard drive on and then fasten it with screws but all cases are different, refer to your manual if you cant see immediately where your hard drive goes, you should install your hard drive and secure with 4 'flat-top' drive screws, mine looks like

Next your optical drive, depending on your case you might have to push a mettle place out of the top, don't worry about breaking it though, it is designed to be broken, after you have pushed that out then insert your optical drive thought the front panel of the case, and secure with 4 'flat-top' screws (2 on each side), it will look a bit like
Step 7- Installing the PSU
Now that you have followed the steps, thoroughly, you are now ready to install the PSU (power supply unit), this gives power to your whole computer, first you need to put the PSU itself into either the top or bottom of the case, and secure it with flat-top screws given, they require 4 of them and are tightened from the exterior of the case, it will look similar to this

Next you have to connects all the PSU cables, different PSU's have different connections but all have a motherboard 20/24 pin connector, and a 12 volt CPU connector, mine has:
-20/24 pin motherboard
-12volt CPU
-2x molex
-2x sata
We will connect these later...

Next you have to connects all the PSU cables, different PSU's have different connections but all have a motherboard 20/24 pin connector, and a 12 volt CPU connector, mine has:
-20/24 pin motherboard
-12volt CPU
-2x molex
-2x sata
We will connect these later...
Step 6- Installing RAM
Now that you have installed your Motherboard, CPU and Heatsink, its now time to install your RAM (random access memory), depending on how your motherboard is laid out and how many stick of RAM you are installing find the 1st RAM slot, and install the first RAM stick then if you wish to install another look for the RAM slot that is the same colour (plastic) then install the next stick, some motherboard have 4 slots some just have 2, but remember to use anti static protection when dealing with RAM,
when you have finished installing it will look a little like this

when you have finished installing it will look a little like this

Step 5- Installing the Heatsink

Next you need to 'fix' the heatsink on top of your cpu on your motherboard, there are many ways that this can be done, all heatsinks are different but this is the way for 'stock' heatsinks, first you align the heatsink up with the holes around the CPU socket, and push down this is called a 'temp six' then you push down the black clips and then turn them anticlockwise to fix them, you do this in an opposite arrangement (e.g. bottom right then top left then bottom bottom left and top right) and when that's completed you need to plug in your heatsink fan, find the pinout called 'sys fan' on the motherboard (next to the CPU) then plug in your fan, it will look a bit like

Step 4- Installing the Motherboard and CPU
Now that the back-plate is installed, and the 'hop-ups' are inserted, you can now move onto unpacking your motherboard, don't forget to use anti-static precautions when touching your components, depending on what size your motherboard is, depending how many screws you will need, mine is m-atx so I need 6 screws, so place your motherboard in place and insert the screws into the hop-ups that you installed earlier, making sure the motherboard lines up with the back plate too, it will look a bit like

When the motherboard is inserted then you can install the CPU, so lift up the arm next to the CPU socket and install your CPU the right way round (using the little triangles on the socket and CPU to line up the both) then secure tightly with putting the arm back into position
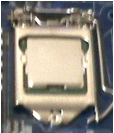

When the motherboard is inserted then you can install the CPU, so lift up the arm next to the CPU socket and install your CPU the right way round (using the little triangles on the socket and CPU to line up the both) then secure tightly with putting the arm back into position

Step 3- Installing the Back-Plate

Step 2- Preparing Your Case
The second step is to make sure your case is ready for the components to go in, with my computer i have to insert 'hop-ups' on the case so the motherboard will sit on and then be screwed on, this is to stop the motherboard short circuiting on the mettle case, yours night be a little different, but here is mine

*notice the bag of screws attached to the case, every computer case comes with screws, so don't panic

*notice the bag of screws attached to the case, every computer case comes with screws, so don't panic
Step 1- Preparing Equipment
To begin with building a computer you will need to have all of your components and tools ready, and make a clear space on a desk to start your build, When I build computers I like to have a list of components that are required to build a complete a computer, and tick them of when they are installed into the case/motherboard, so check all of your components and tools are ready and you take anti-static precautions by using such as gloves, wristbands, and many other ways to protect your components


Intro
Hi, My names Jack Robinson and welcome to my blog, this blog is on behalf of my college coursework, and this is a step by step guild on how to build and connect a normal standalone everyday PC, Enjoy
Subscribe to:
Posts (Atom)